


We'll be overviewing how to mount a red-dot sight to an optic-ready pistol.
The mounting of Red-Dot Sights to handguns is a simple task that’s been needlessly overcomplicated. Allow me to cut through the noise and help to get your chosen electronic sight mounted.
As the dot sight has become a ubiquitous part of handgunning, an entire subculture has sprouted up around mounting them. Ignore the sorcery and stick to common sense. The first thing you need to figure out is if the pistol requires the use of adapter plates. These plates allow the pistol to accommodate various brands and take advantage of the latest optic technology regardless of the footprint. Guns & Ammo readers tend to be among the most technically savvy, but many shooters who are new lack that technical understanding and end up with a pistol and optic that don’t match. This problem has been exacerbated by the gun companies that don’t include plates with their products. These require the shooter to source a specific plate the pistol requires. It’s an easy fix. A quick perusal of the internet will usually uncover the exact plate needed.
While many factory adapter plates work fine, they are a common failure point when running a gun hard, such as during high round count training. For owners of Glock pistols, I recommend going the aftermarket route for plates or mill work to the slide. While there are many good options, I use C&H Precision Weapons plates on my duty pistols because of their unique “T” nut, which allows more thread engagement. Do your research beforehand and make sure that when you’re gathering all your items, you’re double checking that you have the correct plate for the optic and the pistol. Many optics and optic-mounting footprints appear similar, so be diligent.
An easy way to eliminate the need for adapter-plate systems is to have a slide milled for a specific optic or to purchase a pistol with a direct-mount option. Of course, this commits you to one footprint, but it is the most durable choice. Many compact pistol manufacturers, such as SIG Sauer with its P365 series, have gone this direction from the factory and do away with plates entirely.
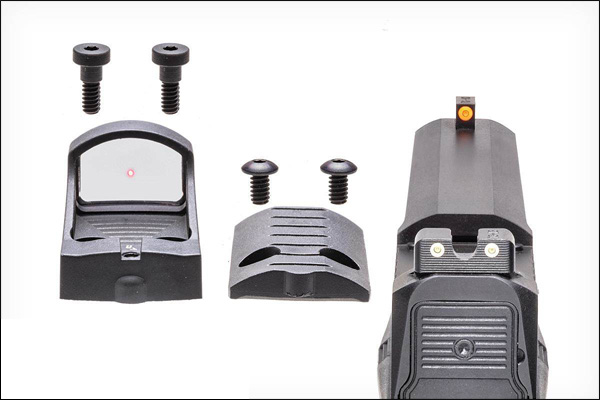
Once you’ve decided on pistol, optic and plate (if necessary), it’s time to get to work. Sometimes, it’s easy to get overwhelmed with all the small parts, so make sure that your work area is free from clutter, including superfluous screws, pins, plates, and anything else that can cause confusion. Remove everything from its packaging and place it neatly on your workspace. Make sure that you have some sort of degreaser available, as well as an appropriate inch-pound torque driver. Most optics, plates and dot-ready pistols come with several sets of fasteners, so segregate them; I use a magnetic bowl.
Remove the factory coverplate, if equipped, and clean and degrease the threads and metal-to-metal contact points thoroughly. Don’t cut corners to save time; this is a piece of lifesaving equipment.
Once you have everything cleaned and degreased, attach the adapter plate to the pistol. Ensure that the fasteners (screws) seat, but don’t torque them down. Once you have the plate attached, check for gaps and movement. If there is noticeable movement, back the fasteners out and reseat them. If they are properly seated and there is still movement, they are too long. Sometimes this happens because of tolerance stacking, and sometimes this happens because the wrong fasteners are provided. If they are a little long, minor filing can sometimes work to fit the screws. If this is a chore that you’re not comfortable with, take the job to a gunsmith or contact the manufacturer. While installing optics before a recent red-dot class, I had several Trijicon RMR fasteners that were too long — at least an eighth of an inch. I called the customer support line and they sent me five sets of the appropriate fasteners in 2 days.
After you are satisfied with the fitment of the adapter plate, attach the optic. If the optic uses a sealer plate, make sure that is included. Then, check everything, again. Go through the same steps you did when attaching the adapter plate to the pistol. Dry fitment is essential. Don’t skip it.
At this point, I recommend clearing your workbench except for the threadlocker and torque driver. Inspect the dry fit of the optic one more time and check for gaps and movement. If everything looks good, remove the optic from the plate and place it, along with the fasteners, in a place where you won’t jostle it and lose a fastener. Now, remove one fastener from the plate and apply the recommended threadlocker. If none is specified, use blue. There is no need to douse screw threads with adhesive; a couple of drops on both sides will suffice. Most optics use blue Loctite or equivalent. If you use a red variant, be warned that getting the optic off again is going to be a chore and might require tools and supplies that you probably don’t have.
A pistol was recently shipped to me with the plate attached using red Loctite and it cost me three bits — and some cursing — to get it off. Using the torque driver and an appropriately sized bit, install the fastener to the torque spec, often 15 to 18 inch-pounds (in.-lbs.). Repeat the process with the next screw fastener and put it aside. I typically wait for a couple of hours allowing the threadlocker to set. I then install the optic to the plate in the same manner. At this point, I put the pistol aside and let it sit for at least 12 hours for the adhesive to cure before shooting it.
Once the threadlocker has cured, it’s time to zero the optic. Before you fire the first shot, use a paint pen (or nail polish) and draw a line on the screw fastener’s head and overlap the body of the optic. Do this so that you can visually ensure that the fasteners are not backing out and loosening under recoil. This is an important step and should not be skipped, either.
To get a rough estimate of the optic’s zero, align your sights on the target and adjust the dot until its is positioned on the top edge of the centered front sight post, assuming that your sights are tall enough. If you don’t have tall backup sights, I recommend starting with the target close, say 3 yards, and then walk the dot into the bullseye and repeat at 5, 7 and 10 yards. Don’t be afraid of big dope adjustments. Once you’re zeroed at 10, move the target out to 25 to get a last verification. There can be a big difference between the 10- and 25-yard zero, so make sure that you verify the point of impact at those distances, even if you can’t see yourself shooting that far. There are plenty of locations and scenarios that could present a 25-yard shot against a bad guy. (Consider the Greenwood Park Mall Shooting in July 2022.) Once the zero is set, some shooters mark their adjustments in the same manner as the screw fasteners.
There’s more than one way to get the job done. Regardless of how you install your optics, never cut corners on something that you’re going to bet your life on.
Check out the huge selection of Red-Dot Sights at GunsInternational.com.
Article courtesy of Guns & Ammo.
The mounting of Red-Dot Sights to handguns is a simple task that’s been needlessly overcomplicated. Allow me to cut through the noise and help to get your chosen electronic sight mounted.
As the dot sight has become a ubiquitous part of handgunning, an entire subculture has sprouted up around mounting them. Ignore the sorcery and stick to common sense. The first thing you need to figure out is if the pistol requires the use of adapter plates. These plates allow the pistol to accommodate various brands and take advantage of the latest optic technology regardless of the footprint. Guns & Ammo readers tend to be among the most technically savvy, but many shooters who are new lack that technical understanding and end up with a pistol and optic that don’t match. This problem has been exacerbated by the gun companies that don’t include plates with their products. These require the shooter to source a specific plate the pistol requires. It’s an easy fix. A quick perusal of the internet will usually uncover the exact plate needed.
 |
| A clean workspace is essential once you’ve selected parts and materials. Lay the components out that will be used to mount a sight, and organize them in a way that will be easily identifiable. You shouldn’t have to search for anything while you work. |
While many factory adapter plates work fine, they are a common failure point when running a gun hard, such as during high round count training. For owners of Glock pistols, I recommend going the aftermarket route for plates or mill work to the slide. While there are many good options, I use C&H Precision Weapons plates on my duty pistols because of their unique “T” nut, which allows more thread engagement. Do your research beforehand and make sure that when you’re gathering all your items, you’re double checking that you have the correct plate for the optic and the pistol. Many optics and optic-mounting footprints appear similar, so be diligent.
An easy way to eliminate the need for adapter-plate systems is to have a slide milled for a specific optic or to purchase a pistol with a direct-mount option. Of course, this commits you to one footprint, but it is the most durable choice. Many compact pistol manufacturers, such as SIG Sauer with its P365 series, have gone this direction from the factory and do away with plates entirely.
 |
| Before mounting, any surface that will be in contact with another part should be cleaned and degreased. (Photo by Mark Fingar) |
Once you’ve decided on pistol, optic and plate (if necessary), it’s time to get to work. Sometimes, it’s easy to get overwhelmed with all the small parts, so make sure that your work area is free from clutter, including superfluous screws, pins, plates, and anything else that can cause confusion. Remove everything from its packaging and place it neatly on your workspace. Make sure that you have some sort of degreaser available, as well as an appropriate inch-pound torque driver. Most optics, plates and dot-ready pistols come with several sets of fasteners, so segregate them; I use a magnetic bowl.
Remove the factory coverplate, if equipped, and clean and degrease the threads and metal-to-metal contact points thoroughly. Don’t cut corners to save time; this is a piece of lifesaving equipment.
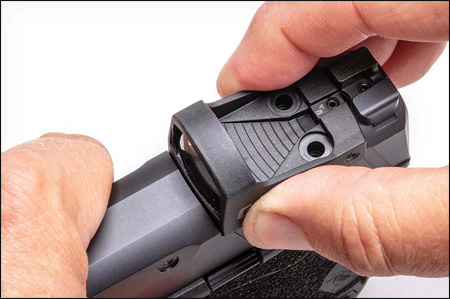 |
| Dry fitting is an important step to ensure that no part will work loose during shooting. Don’t skip this step. (Photo by Mark Fingar) |
Once you have everything cleaned and degreased, attach the adapter plate to the pistol. Ensure that the fasteners (screws) seat, but don’t torque them down. Once you have the plate attached, check for gaps and movement. If there is noticeable movement, back the fasteners out and reseat them. If they are properly seated and there is still movement, they are too long. Sometimes this happens because of tolerance stacking, and sometimes this happens because the wrong fasteners are provided. If they are a little long, minor filing can sometimes work to fit the screws. If this is a chore that you’re not comfortable with, take the job to a gunsmith or contact the manufacturer. While installing optics before a recent red-dot class, I had several Trijicon RMR fasteners that were too long — at least an eighth of an inch. I called the customer support line and they sent me five sets of the appropriate fasteners in 2 days.
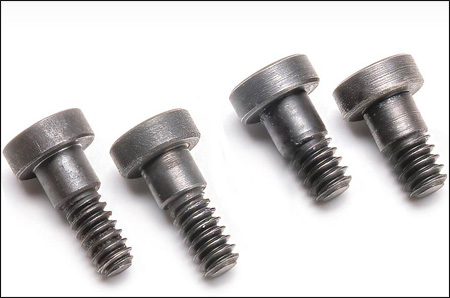 |
| Ensure that the screw fasteners are not too long or too short. Give these a test-fit as well, but without tightening them. (Photo by Mark Fingar) |
After you are satisfied with the fitment of the adapter plate, attach the optic. If the optic uses a sealer plate, make sure that is included. Then, check everything, again. Go through the same steps you did when attaching the adapter plate to the pistol. Dry fitment is essential. Don’t skip it.
At this point, I recommend clearing your workbench except for the threadlocker and torque driver. Inspect the dry fit of the optic one more time and check for gaps and movement. If everything looks good, remove the optic from the plate and place it, along with the fasteners, in a place where you won’t jostle it and lose a fastener. Now, remove one fastener from the plate and apply the recommended threadlocker. If none is specified, use blue. There is no need to douse screw threads with adhesive; a couple of drops on both sides will suffice. Most optics use blue Loctite or equivalent. If you use a red variant, be warned that getting the optic off again is going to be a chore and might require tools and supplies that you probably don’t have.
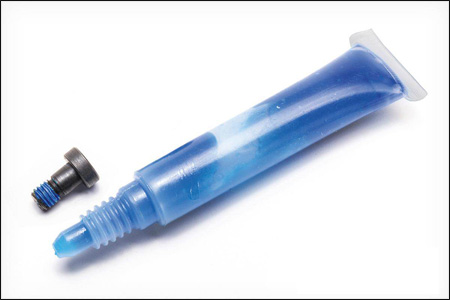 |
| Once the screws, plates and optics are confirmed to fit, apply a removeable threadlocker. Blue adhesive should do the trick. (Photo by Mark Fingar) |
A pistol was recently shipped to me with the plate attached using red Loctite and it cost me three bits — and some cursing — to get it off. Using the torque driver and an appropriately sized bit, install the fastener to the torque spec, often 15 to 18 inch-pounds (in.-lbs.). Repeat the process with the next screw fastener and put it aside. I typically wait for a couple of hours allowing the threadlocker to set. I then install the optic to the plate in the same manner. At this point, I put the pistol aside and let it sit for at least 12 hours for the adhesive to cure before shooting it.
 |
| Marking the screw fasteners to the housing allows one to check at-a-glace for any movement that could result in a loose optic. (Photo by Mark Fingar) |
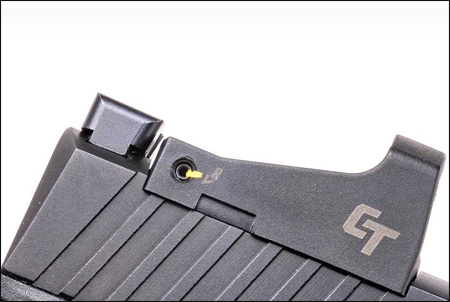
Once the threadlocker has cured, it’s time to zero the optic. Before you fire the first shot, use a paint pen (or nail polish) and draw a line on the screw fastener’s head and overlap the body of the optic. Do this so that you can visually ensure that the fasteners are not backing out and loosening under recoil. This is an important step and should not be skipped, either.
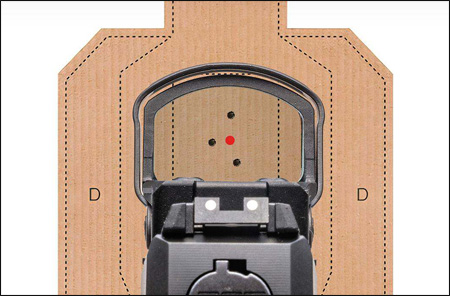 |
| To zero without tall sights, start close and work out to longer distances. Gross adjustments will move the group at close range. (Photo by Mark Fingar) |
To get a rough estimate of the optic’s zero, align your sights on the target and adjust the dot until its is positioned on the top edge of the centered front sight post, assuming that your sights are tall enough. If you don’t have tall backup sights, I recommend starting with the target close, say 3 yards, and then walk the dot into the bullseye and repeat at 5, 7 and 10 yards. Don’t be afraid of big dope adjustments. Once you’re zeroed at 10, move the target out to 25 to get a last verification. There can be a big difference between the 10- and 25-yard zero, so make sure that you verify the point of impact at those distances, even if you can’t see yourself shooting that far. There are plenty of locations and scenarios that could present a 25-yard shot against a bad guy. (Consider the Greenwood Park Mall Shooting in July 2022.) Once the zero is set, some shooters mark their adjustments in the same manner as the screw fasteners.
 |
| Marking the adjustments like the fasteners does the same thing: It provides an easy reference to monitor unintended movement. (Photo by Mark Fingar) |
There’s more than one way to get the job done. Regardless of how you install your optics, never cut corners on something that you’re going to bet your life on.
Check out the huge selection of Red-Dot Sights at GunsInternational.com.
Article courtesy of Guns & Ammo.


Guns International Advertising Policy
GunsInternational.com is the #1 Gun Classified website that brings gun buyers and gun brokers or sellers together through classified advertising of guns, gun related items and services for sale online. If you are looking to buy guns online or sell guns online, you have come to the right place. GunsInternational.com gun classifieds currently have over 200,000 guns for sale online by numerous dealers and collectors alike. Guns International makes no representation or warranty as to the accuracy of the information contained in the gun classifieds, gun parts or gun services classifieds listings. Buyers and sellers are required to know and comply with all applicable local, state, federal and international firearm laws.
GunsInternational.com is the #1 Gun Classified website that brings gun buyers and gun brokers or sellers together through classified advertising of guns, gun related items and services for sale online. If you are looking to buy guns online or sell guns online, you have come to the right place. GunsInternational.com gun classifieds currently have over 200,000 guns for sale online by numerous dealers and collectors alike. Guns International makes no representation or warranty as to the accuracy of the information contained in the gun classifieds, gun parts or gun services classifieds listings. Buyers and sellers are required to know and comply with all applicable local, state, federal and international firearm laws.

©2006 - 2025 all rights reserved. | Guns International.com | V4.1 ww3


Privacy Policy
User Agreement
FAQs
Contact Us
Careers
©2006 - 2025 all rights reserved.
Guns International.com | V4.1 ww3
Guns International.com | V4.1 ww3